Typography | Task 1 - Exercises
23/04/24 - 24/05/24 | Week 1 - Week 5
Nadia Chong Wen | 0355736 |
Bachelor's of Design (Honours) in Creative Media
Task 1 | Exercises
Table of Contents
- Lecture Notes
- Instructions
- Task 1 | Exploration
- Task 1 | Text Formatting
- Feedback
- Reflection
- Further Reading
I. Lecture Notes | Week 1 - Week 5
The module focuses on typographic anatomy, hierarchy, expression and composition. Typography is what language looks like and this module endeavours to impart knowledge that allows students to communicate and shape verbal messages effectively.
Typo 0 | Introduction
Typography: The art and technique of arranging type, making written language legible, readable and appealing when displayed.
Font: The individual font or weight within a typeface.
Georgia Regular / Georgia Italic / Georgia Bold
Typeface: The family of fonts/weights that share similar
characteristics/styles.
Georgia
/ Arial /
Times New Roman
Typo 1 | Development
1. Early Letterform Development: Phoenician to Roman
- Writing meant scratching into wet clay with sharpened stick or carved into stone via a chisel.
- Uppercase forms are simple combination of straight lines and pieces of circles, as the tools required.

- Phoenicians wrote from right to left like other Semitic people. The Greek created a style called boustrophedon (how the ox ploughs), which means that lines of text are read alternatively from left to right and left to right.
- As the direction of the of reading changes, so does the orientation of letterforms.

2. Hand Script from 3rd - 10th CE
- Square capitals were found in Roman monuments. They contained serifs added to the main stroke. They were achieved by holding a pen at a 60 degree angle off perpendicular.
- Rustic capitals were the compressed version of square capitals. They took less time to write compared to square capitals but were also harder to read. They were achieved by holding the pen at a 30 degree angle off perpendicular.
- Cursive hand were used in everyday transactions. They were simplified for speed resulting in formation of some lowercase letterforms. Uncials incorporated some aspects of Roman cursive hand.
- Uncials means 12th of anything. They were more readable then rustic capitals.
- Half uncials marks the beginning of the lower cases letterform due to the formalization of the cursive hand.
Charlemagne issued an edict to standardize all ecclesiastical text. This was entrusted to Abbot of St Martin Tours. He rewrote the texts using uppercase, miniscule, capitalization and punctuation which set the standard for calligraphy in that century.
The dissolution of Charlemagne's empire led to a condense and strongly vertical letterform in Northern Europe known as Blackletter or Textura. In the South, a more rounder, openhanded letterform was used known as Rotunda.
Text Type Classifications
- 1450 Blackletter: The earliest printing type.
- 1475 Oldstyle: Based on the lowercase forms used by Italian humanist scholars for book copying and the uppercase letterforms found inscribed on roman ruins.
- 1500 Italic: Condensed and close-set (no longer considered as a separate typeface).
- 1550 Script: An attempt to replicate engraved calligraphic forms.
- 1750 Transitional: A refinement of oldstyle forms – thick and thin relationships were exaggerated, and brackets were lightened.
- 1775 Modern: Serifs are unbracketed, and the contrast between thick and thin are extreme.
- 1825 Square Serif / Slab Serif: Unbracketed with little variation between thick and thin strokes.
- 1900 Sans Serif: No more serifs.
- 1990 Serif / Sans Serif: Includes both serif and sans serif alphabets.
Typo 3 | Text (Part 1)
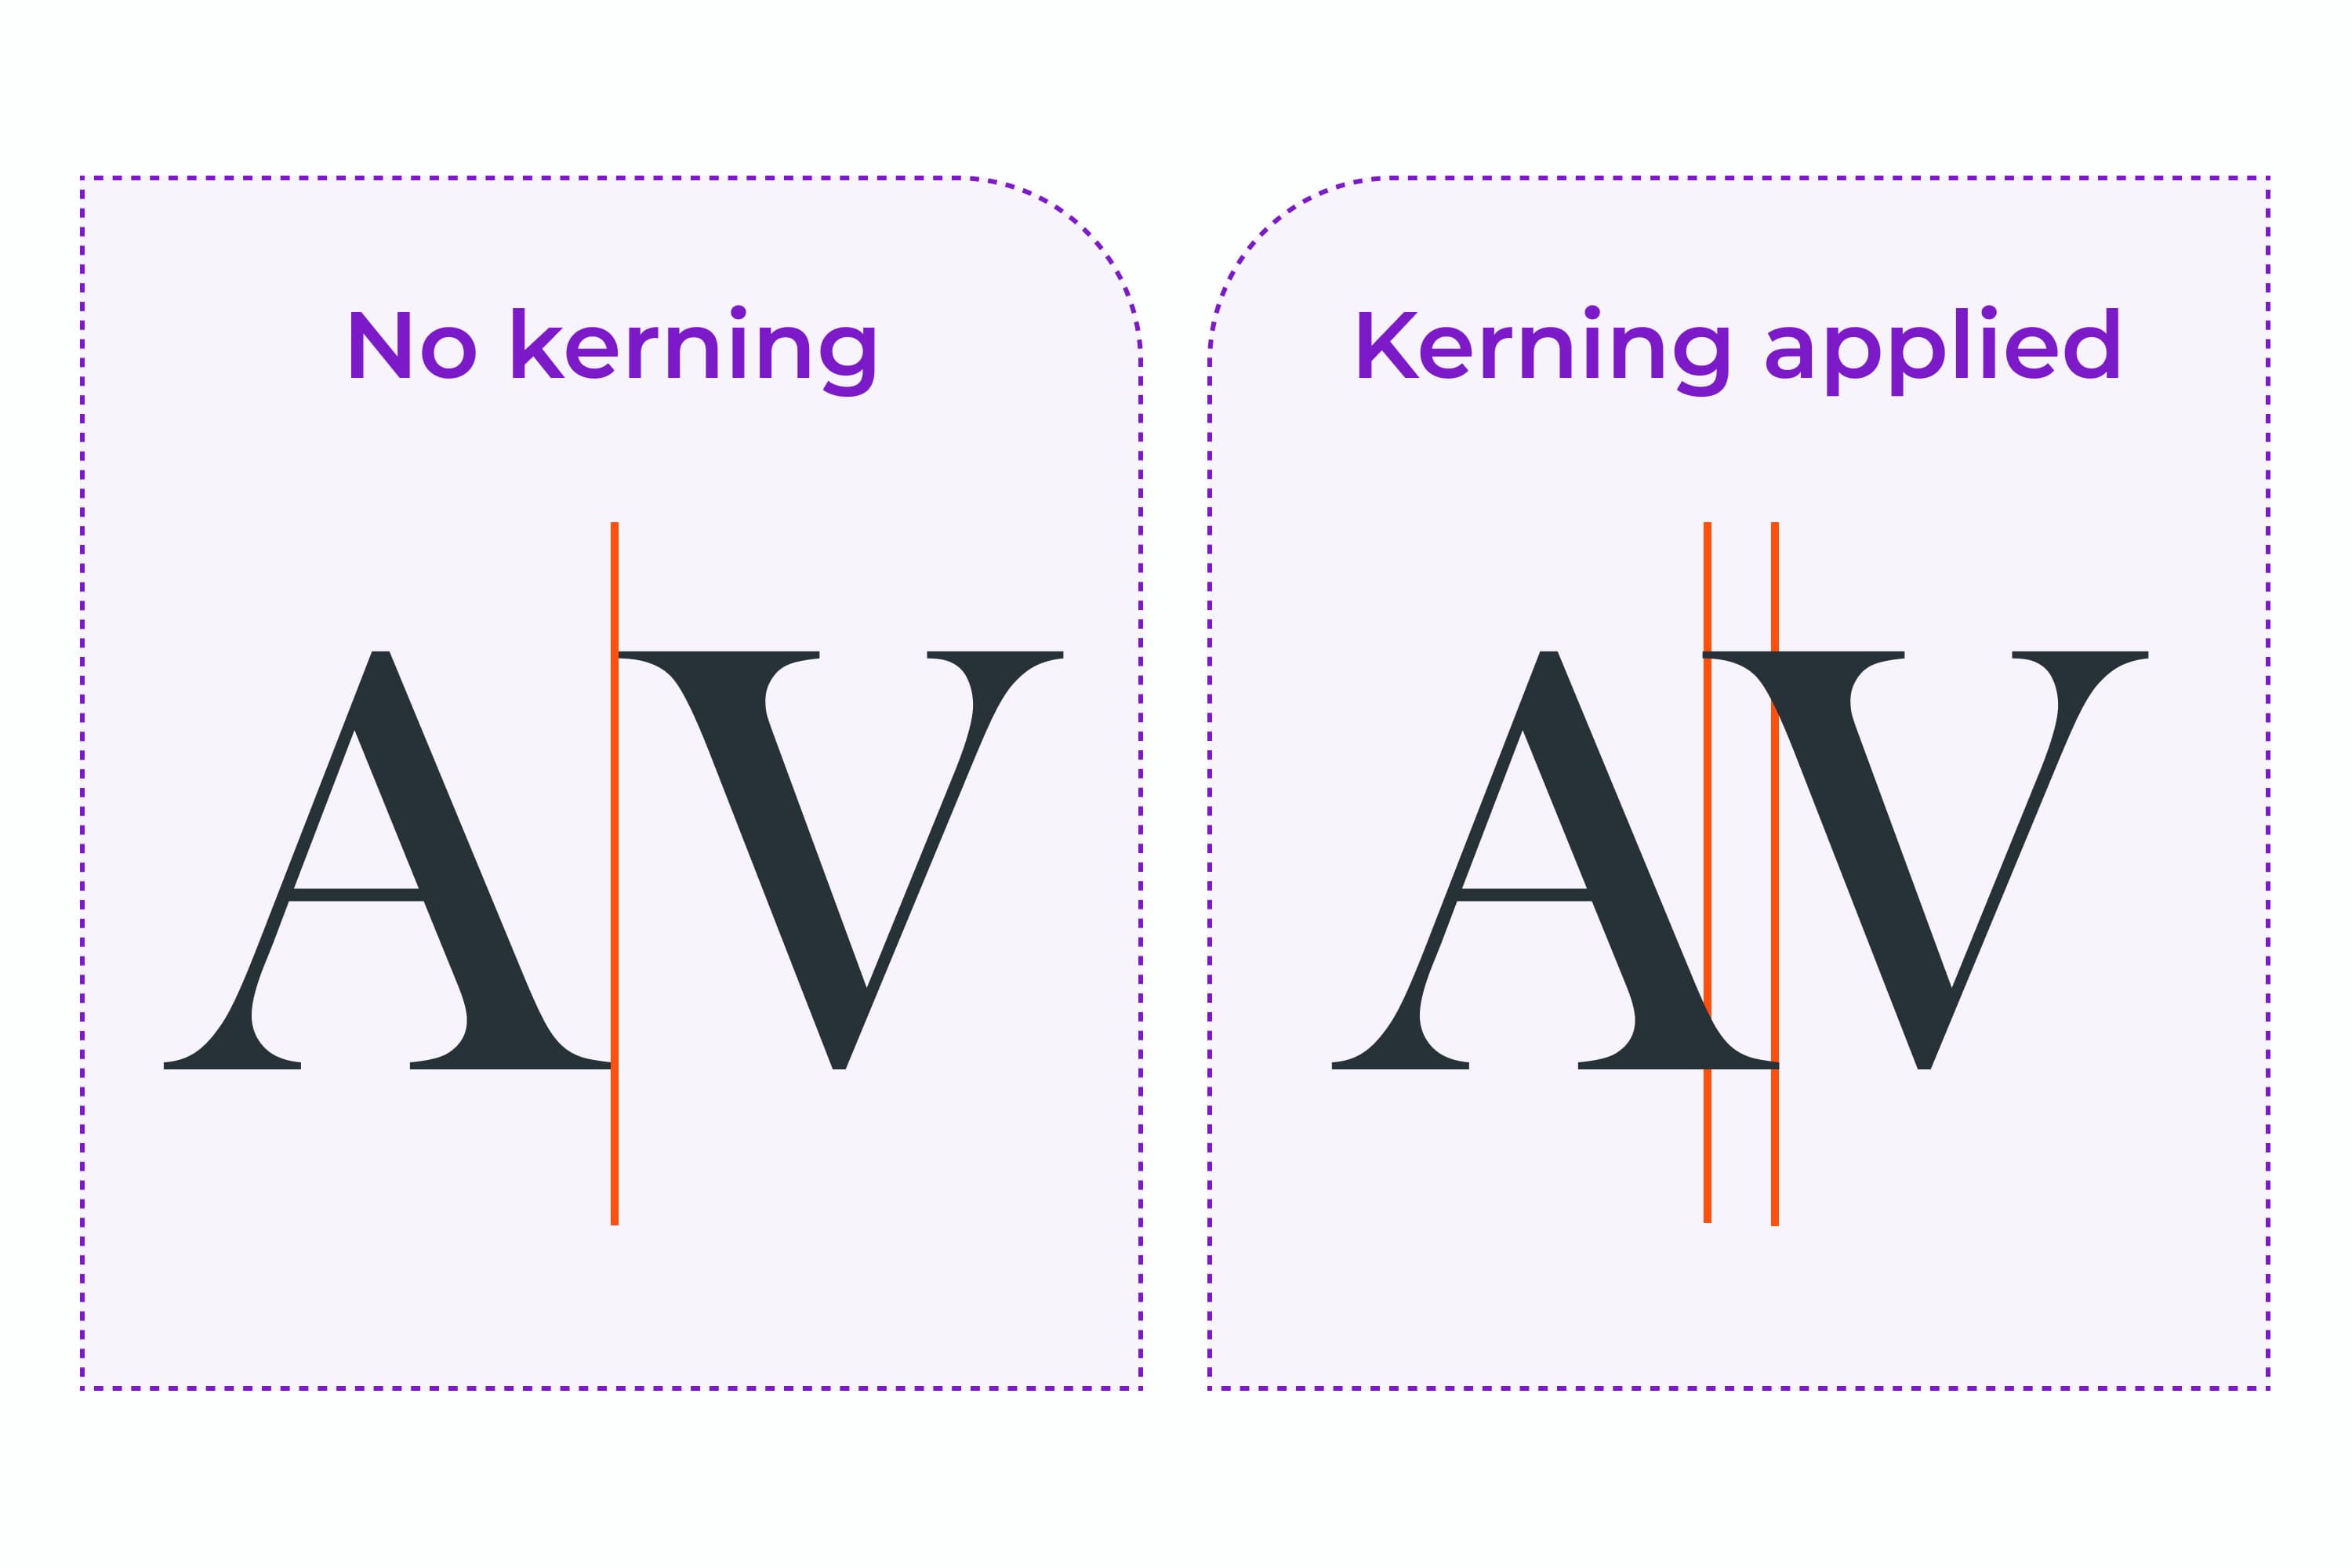
Kerning: The automatic adjustment of space between letters.
Letterspacing: To add space between the letters.
Tracking: Addition and removal of space in a word or sentence.

Designers always letterspace uppercase letters but there is a resistance within the community to letterspace lowercase letters within texts. Uppercase letterforms are meant to be able to stand on their own while lowercase letterforms require counter form created between letters to maintain their reading.
Formatting Text
- Flush Left: Closely mirrors the asymmetrical experience of handwriting. Spaces between words are consistent throughout the text which allows for an even gray value.
- Centered: Imposes symmetry and assigns equal value and weight to both ends of any line. Creates a strong shape on the page, therefore important to amend line breaks so that the text does not appear jagged.
- Flush Right: Places Emphasis on the end of a line. Useful in certain situations (captions) where the text and image might be ambiguous without a strong orientation to the right.
- Justified: Also imposes symmetry similar to centered. The openness caused from lines can sometimes produce "rivers" of empty space through texts. Needs attention to line breaks and hyphentation to amend "rivers."
A typographer's first job is to make sure that the author's message has
a clear, appropriate presentation.
- Type that calls attention to itself before the reader can get to the actual words is interference and should be avoided.
- Quite simply if you see the type before you see the words, change the type.
A good typographer has to know which typeface fits the message at hand the best. The textures should be considered too.
Type with a relatively generous x-height or heavy stroke width produces a dark mass on the page than type with a relatively smaller x-height or lighter stroke.

Leading and Line Length
- Type size: Text type should be large enough to be read easily at arm's length.
- Leading: Text that is set too tightly encourages vertical eye movement; the reader can easily loose his or her place. Type that is set too loosely distract the reader from material at hand.
- Line Length: Keep line length between 55-65 characters.
Typo 4 | Text (Part 2)
Widow: Short line of type left alone at the end of a column of text.
Orphan: Short line of type left alone at the start of a new column.
Designers (usually ones that deal with large amount of text in websites/books/magazines/etc.) must take great care to avoid these occurrences.

In justified text, both of these lines are considered serious gaffes. Flush right and ragged left text is a bit more forgiving towards [Widows] but unpardonable with [Orphans]. The solution to this is to rebreak the line endings throughout the paragraph so the last line isn't noticeably short.
A head indicates a clear break between topics within a section.

B head indicates a new supporting argument or example for the topic at hand and is like a subordinate to the A head.

C Head highlights specific facets of material within B head text. They do not materially interrupt the flow of reading.

Putting a sequence of subheads together makes a hierarchy.
Cross aligning headlines and captions with text type reinforces the architectural sense of the page and the structure while articulating the complimentary vertical rhythms.
Typo 2 | Basic
Baseline: The imaginary line that is the visual base of the
letterforms.
Median: Imaginary line defining the x-height of letterforms.
X-height: The height in any typeface of the lowercase [x].
Ornaments: Used as flourishes in invitations or certificates. Usually provided as a font in the larger typeface family. Only a few typefaces contain these like Adobe Caslon Pro.

II. Instructions
III. Task 1 | Exercise 1 - Exploration
3.1 Sketches
During my second week, I did not realize that we were supposed to present sketches based off words that were given to us by my tutor until I arrived at the tutorial itself. Even with the little time I had, I decided to pick the words [Spark/Roll/Crash/Balance] to see how much I can utilize the words with my limited resources.

I would say that my favorite to work on and brainstorm for would be [Spark/Crash/Balance]. The feedback I received from my tutor was that I had to put more thought into it and I made it my goal to do my best for the next sketch I'd make.

After the feedback my tutor has given, I decided to make another sketch that shows the proper ideas of the sketches I wanted to convey in the original sketch to give a clearer view on what I wanted to do for the next part of making the type within Adobe Illustrator.
3.2 Digitization
I went on to digitize the ideas I had from the sketches. I noticed that it would be hard for to execute some of the ideas I had during the sketching phase, so I made appropriate changes to them in order to be able to still convey the idea.

It was difficult to come up with ideas and execute them due to my unfamiliarity towards Adobe Illustrator and Type. However, I did what I could with my limited abilities and made the following Type Designs.

For the word [Spark], I decided to think of ways to express the word in its entirety. Mr. Vinod suggested that we do not add too many effects and rely on the words and manipulating in order to get the message through so I tried to encapsulate that.
#1 Type Design: The thought process I had when making the type was a spark of light from a source, like a lightbulb on the ceiling or a lamp. With that in mind, I decided to curve the two ends of the type and add a line at the [A] in order to make it seem lamp-shaped. I decided to make the [A] white in order emphasize that it was the source of the light.
#2 Type Design: Similar to #1, I decided to use the same idea but take in a different and simpler approach. I put more focus on the [A], making it the biggest letter within the type and adding a few lines to indicate sparks.
#3 Type Design: I decided to take a different approach for this design. I wanted to give it the effect of a zap that comes out of nowhere. With that in mind, I made the [K] bigger than the other words of the same size in order to give a sense of suddenness.
#4 Type Design: For this design, I wanted to try a more stylistic approach. For this [Spark], I wanted to give it a feeling of a rush of energy or a spark of energy. I decided to italicize it and add some thunder symbols to give the message of electricity.

The word [Balance] gave many possibilities of type expressions that it was hard to choose or think of one that would truly suit how to go about expressing the word in its entirety. In this case, I decided the designs simple in order to fully tell what is [Balance] to whoever may read it.
#1 Type Design: With this type, I was experimenting on which letter to choose to make bigger and bolder in order to give the illusion of balance. While choosing [A] would've been good as a show of balance, I decided to go with [L]. Due to the effects that I chose, I thought it would look more balanced if I were to choose the letter as a balancer between the two [As].
#2 Type Design: For this design, it is similar to the thought process I had on the first design. [ba] would balance on the [lance] as it was fully on the bottom. However, I did not think ahead on how I would animate this, therefore it wasn't chosen as one of the final type expressions.
#3 Type Design: With the thought that [Balance] as a word was already balanced in its own way, I decided that one of the best way to show balance was to choose a font that had balanced capitalized letters and put it in the middle of the box in order to express balance.
#4 Type Design: The idea I had for this was to make [Balance] similar to an object that symbolizes balance. In this case, the object is a scale. Using the middle [A] as the balancer, I made a line which makes it seem like the [A] on the bottom is balancing the rest of the words.

[Crash] was a difficult word to design for me, personally. I did not have many ideas for this word, considering when I think of it, I can only think of accidents or breaking pieces. So I decided to approach this same idea in different ways.
#1 Type Design: With the feedback Mr. Vinod gave me, I decided to try making a [Crash] that would be different from everyone else where the word is crashing in the center.
#2 Type Design: I decided to put multiple of the same words together and make them crash together to form the illusion of crashing into each other.
#3 Type Design: I tried to depict [Crash] crashing into the side of the box.
#4 Type Design: I went with another way [Crash] could be depicted which was the word getting slammed down.

[Roll] was a trouble for me to come up with ideas. Mr. Vinod showed me some examples of what to do with the word and I decided to base some of my designs with the ones that I had in mind from my sketches.
#1 Type Design: For this design, I wanted [Roll] to be animated in a way that it was rolling like a ball in the cube. I decided to make the words curl around a ball and indicate motion with lines at the top of the letters.
#2 Type Design: I decided to make another kind of rolling motion. This time, I thought it would be good for the letters to all be individually rolling down a hill.
#3 Type Design: This design was inspired by one of the designs that Mr. Vinod showed me in order to help me with my work. The [O] was made to have the motion of rolling away while the other letters were still.
#4 Type Design: This design was to express all the letters rolling individually. This was a thought ahead for the animation, but I realized that it might be very difficult to animate every individual alphabet with my limited time.
3.3 Final Type Expressions

I decided to choose these designs due to believing they were able to represent the meaning of their words well. I adjusted some of the designs in accordance with Mr. Vinod's suggestions. [Roll] and [Balance] were adjusted to the way they are and made into their final designs.
3.4 Animation & Making GIF
I proceeded to make the GIF after making my final type expressions and chose the word [Roll] as the word to animate for this part of the task due to its simplicity compared to the other designs. While I do believe I could animate those, I chose [Roll] to be efficient for completing this task.


The reason why I decided to make so little frames is due to the fact that while I could make it longer, many of the frames could easily be reused and adjusted in order to make a simple animation. I have a basic understanding of some animation and tried to apply some of the things I learned on the internet into this gif.

This was the result of my third attempt of the gif. The reason as to why I decided not to show the first and second gif attempt is due to an error I made on the canvas and which ended up making the gif too small to even see the animation.
I originally thought that this gif was good since Mr. Vinod approved of it but after some time looking at it, I felt that it still felt wrong and asked the opinion of a friend.
3.5 Final Type Animation

After some more adjustments and adding extra frames at certain parts of the animation to make the [O] stay longer in place, I made the final gif. I also added a few more adjusted frames to make the [O] seem to bounce on the [L] more as it came to a stop before rolling away once more.
IV. Task 1 | Exercise 2 - Text Formatting
4.1 Kerning & Tracking
Using the 10 typefaces provided to the class, I started to do the exercises assigned to me.


4.2 Layout Formatting
I used [Univers LT Std] and experimented with the types to see which would be better suited for a layout while also gathering what would be good for a layout that was simplistic but also east to digest. Originally, I mistakenly did all this within Adobe Illustrator instead of Adobe Indesign and made many mistakes.


-01.png)
Fortunately, I managed to notice before I continued trying some commands that didn't work on Illustrator. I rewatched Mr. Vinod's tutorial videos in order to once again gain a grasp on how to use Indesign for the layout and came up with a few layouts in order to familiarize myself more.


After getting used to the controls that I needed and experimenting on how to make sure everything was aligned to the baseline, I came up with some designs that I came to like. I also switched the fonts from [Univers LT Std] to [Bembo Std] since I thought it looked better with that typeface instead of the previous one.


After coming out with these layouts, I considered both of them to be delivered well and I got varying opinions on both of the layouts from friends and family. I decided to go with the #2 layout due to the text of #1 being too uneven.
4.3 Final Text Formatting Layout
Head Line
- Font: Bembo Std
- Type Sizes: 12-60 pt
- Leading: 20 pt
- Paragraph spacing: 62 pt
Body
- Fonts: Bembo Std
- Type Sizes: 10 pt
- Leading: 12 pt
- Paragraph spacing: 12 pt
- Characters per-line: 58
- Alignment: Align Left
- Margins: 12.7 mm (Top + Left + Right) / 50 mm (Bottom)
- Columns: 4
- Gutter: 5 mm


Figure 4.3 | Final Layout (PDF), Week 4 (20/05/24)
Figure 4.4 | Final Layout Grid (PDF), Week 4 (20/05/24)
V. Feedback
Week 2
General Feedback:
- Encompass the meaning of the words through visuals.
- Put more thought into the type.
Week 3
General Feedback:
- Understand the difference between idea and concept.
- Treat Feedback from other classmates as yours too.
- Download demo version of Adobe in order to complete the task. (For those who don't have adobe.)
- Try to make the word "Crash" different from other classmates as opposed to everything crashing.
- Finish the digitization of the type by this week.
Week 4
General Feedback:
- Tell someone to look at your work and make sure they can understand it.
- The [Roll] Gif looked good.
- Adjust some of the designs.
VI. Reflection
Experience
My experience with this Task was both very stressful and very educational. While learning the lessons was somewhat hard due to my limited attention span, personal issues, and the lack of Adobe Prenium the first few weeks of the class and therefore being unable to do my work, doing the task was actually surprisingly very enjoyable. I enjoyed making different types of type expressions and making the text layout. It was still very challenging to come up with ideas for Exercise 2 due to me having lack of ideas. The environment in the classes were always quite pleasant despite my nervousness to show my work to Mr. Vinod, but he managed to help me through Exercise 1 by offering suggestions.
Overall, while it was hard to meet the deadlines set, it was very enjoyable.
Observations
The past few weeks allowed me to see the ideas of others and Mr. Vinod giving feedback that helped us do better in our Type expressions. It was very helpful that he pointed out some common mistakes and gave us some suggestions to avoid it. Getting my work assessed by Mr. Vinod gave me a much bigger understanding of how I should do certain things and to use my imagination more in order to make ideas that were different from my other classmates.
Findings
The task brought light to my issues of time management due to me having to always rush my work. I also found that I had to check my work schedule more in order to achieve the requirements needed to pass this module. The lessons that I learned in this class really made me realize how important the little details within Typography are and how much effort goes into making sure it is presentable and understandable. It was a very insightful task that will help me with future works, academic or personal.
VII. Further Reading
I decided to read a bit on one of the books our lecturer has given us in order to help further our understanding and this specific book caught my eye. I decided to read this book whenever I feel like I don't have enough understanding on certain parts of typography.

The chapter Typographic Details gives out many tips and recommendations on what typeface and sizes I should use as well as teaching me other principles not mentioned in the lectures.
Notable points made within this chapter:
- Contrast is one of the most important principles in typographic design. Any shift in typeface, type size, or type weight should be emphasized.
- Manually kern and letterspace display type settings. This is always an optical consideration, and the computer is no substitute for the trained eye.
- It is not necessary to insert an additional word space between initial letters.
I also decided to read further into rendering typography on screen, which discusses many challenges typographers must take into account when designing and manipulating fonts.

Notable points made within this page:
- Stroke weight, serif details, curves, and other small details within fonts may be simplified when rendered on a screen.
- Because digital technology uses pixels to display images, curves and diagonal lines within a font may appear jagged.
- Insufficient font size can decrease a font’s legibility since it may lack pixels to properly render its details.
This chapter also detailed the ways to tackle these challenges, such as anti-aliasing, hinting, and pixel fonts.
- Anti-aliasing: Using pixels of intermediate tones smoothen the jagged edges of curves.
- Hinting: Selectively showing pixels in fonts to reshape the outlines of the font to more accurately translate the font into different sized.
- Pixel Fonts: Bitmap-type fonts designed specifically to be displayed using pixels.


Comments
Post a Comment